Posts

Showing posts from June, 2012

Luminate Issues Not displaying Ads in Images

Image
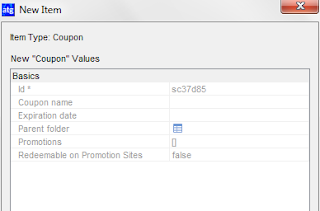
Luminate Ads are not displaying on my posts,Given below my discussion thread with Luminate Team. My Question Hi Luminate team, I am quite new to Luminate,recently i published my blog with Luminate,my blog is primarily targeted to ATG Commerce developers to solve their day to day issues during development and few general topics,currently i am getting a traffic of around 100-200 daily pageviews,but my revenue is shown as 0$,My Current reports says i have 181 image views and i am not seeing the luminate icon or any other ads coming on my images,i can see only the luminate icon when i put my image and publish my post for sometiem,but after that it disappears,is there anything i am missing or its the usual behaviour and will take some time to get the images start working,or is it region specific ? highly appreciate your response. Response from Luminate team I am seeing the icons and adds here: http://atgtipsandtweaks. blogspot.com/2012/06/atg- coupon

atg configure promotion for a Product/Sku - item discount percent off

Image
This is the continuation of the post  configuring pricelist . Before starting your development with Promotion please note the point, Promotion rules are cached for efficiency,as a developer who edit rules frequently,you should not turn off the caching mechanism.To do so,set the maximumCacheSize and maximumCacheEntries properties  of the atg/commerce/pricing/PMDLcache component to 0. Now go to ACC Pricing go to Promotion,Create a new promotion of type 'Item Discount - Percent Off' Now create a PMDL Rule,this is to specify the condition of the discount. Now set few properties according to your requirements.My values just for  reference. Automatically apply to all Orders - Global Promotion,make it true or false appropriately.Value - >false. Discount Percentage - give an integer value as your percentage of Discount for that item.Value ->  5 . Give to a customer more than once - Number of times per user Promotion can be given.Value -> tr

Pricelists in ATG - Basic Configurations

Image
Price Lists are created for sites when a contract lists specific pricing that is not promotional pricing or conditional pricing. In ACC open the tab Pricing and then click on Price Lists. You will need to check first to insure that a price list hasn’t already been created for your site. If no folder exists, create new price list folder by first selecting the folder you want your new price list to be placed into and then clicking on the icon at the top right of the screen to create the folder. When you have the folder selected click on the new folder you have created and then click on New Price List.Type in the Name. Base price field is optional. Select the End date and set it as a future date.Click OK. Now you can set/modify the price for the items you need. Search for the product: items of type Product whose Name contains (ignore case) name item you want to change. Enter a new price for the item.SAVE.Click OK. Now you will have to test your site to insure that the Pr

issue in display ads side by side in blogs

Image
I hope you know how to place two ads side by side,its pretty simple. Add two div tags,with float property of each set to right,left and margin pixel as 1px, see the screen shots below .W ell this works if there is no content below the ads. If we plan to place ads side by side above your content,and  if there is enough space between the two ads, content might overlap,it will automatically fit in between the ads. you can do some tweaks for this .I ncrease the margin pixel size of your container which holds the ads which will  eventually reduce the extra space between  ads. I modified the margin pixel size of the second container .See the modifications below. <div style='float:left; Margin: 1px;'> Your Ad Code </div> <div style='float:left; Margin: 40px;'> Your Ad Code </div> Now my ads are happily displaying side by side without any overlapping content !!!.  Also see the posts Blog option to delete images Luminat

Not able to create New Scenarios and Scenario Templates - Button is disbled

Image
How to enable the scenario buttons in ACC ? Normally Scenarios are not enabled by default in ATG,You need to do a small tweak here to start working with Scenarios,Scenario Templates. There are basically two places you need to do change before working with scenarios  Database changes Use any client tool(toad or sqlplus or heidisql for this)to connect your database,find the table  dss_server_id and modify the value like below. Note - Your server_id is the computer name,to find it,go to MyComputer->Properties->Computer name,and the port is the drp_prt, to find it go to atg component administration view navigate to /atg/dynamo/server/DrpServer -> port,ideally it should be 8850,unless specified other wise. Local Config Changes Create a file scenarioManager.xml inside the folder C:\ATG\ATGXXX\home\localconfig\atg\scenario Add the entry like below and restart your server. Go to ATG

Catalog Maintenace Service Console Output

12:55:11,015 INFO [CatalogMaintenanceService] Service CatalogMaintenance - processing functions: AGS_GENPROPERTIES 12:55:11,104 INFO [CatalogMaintenanceService] Service Lock CatalogMaintenance obtained for service CatalogMaintenance. 12:55:11,110 INFO [AncestorGeneratorService] Service AncestorGenerator - processing functions: AGS_GENPROPERTIES 12:55:11,110 INFO [AncestorGeneratorService] TreeWalkUpdateService:performService starting. 12:55:11,110 INFO [AncestorGeneratorService] Update Catalogs: started at Mon Jun 18 12:55:11 IST 2012 12:55:11,116 INFO [AncestorGeneratorService] Executing count queries for base catalogs, categories and folders. 12:55:11,118 INFO [AncestorGeneratorService] TreeWalkUpdateService:processTree starting to process base catalogs. 12:55:11,118 INFO [AncestorGeneratorService] TreeWalkUpdateService:processTree ended processing of base catalogs. 12:55:11,120 INFO [AncestorGeneratorService] TreeWalkUpdateService:processTree starting to process base catego

atg fullfillment administration from AdminUI

Image
Login to Admin UI,click Commerce Administration-Fullfillment Administration. Click the link under List Shippable Groups to view the list of shipping groups that are pending shipping.The list would be ideally empty. Now Go to your application and place an order with a single shipping group. Go to ACC and refresh the list of hardgood shipping groups.Select the new shipping group.The status should be INITIAL,Refresh and within a short time you can see the status change to PROCESSING and to PENDING_SHIPMENT. Go back to Admin UI-Shippable Groups,You should see your shipping  group awaiting shipping. Go to the section Notify Fullfillment of shipment,fill the OrderID and ShippingGroupId from the above table and click the Ship button.which will notify the fullfillment system that the given shipping group has been shipped to the customer. Go back to ACC and refresh the view of the shipping group one more time.The status should now be NO_PENDING_ACTION. Note: We ha

ATG JSP tags with sample codes

Below are the few usages of JSP tags in ATG context. 1.Setting Bean values in different ways Setting Bean from a parameter <dsp:a href="myfile.jsp" bean="mybean.name" paramvalue="user"> some text... </dsp:a> Setting Bean from a constant <dsp:a href="myfile.jsp" bean="mybean.name" value="sebastian"> some text... </dsp:a> 2.<dsp:getvalueof></dsp:getvalueof> <dsp:getvalueof id="name" bean="mybean.name" idtype="java.lang.String"> this can be used inside other tags(dsp or jstl) or in the page itself using scriplet tags.given below one usage. <c:if test="${empty name}"> <c:set var="name" value="atg_store_formValidationError"/> </c:if> 3.<dsp:setvalue/> The setvalue tag allows you to set a bean property or page parameter with a value copied from another bean property,page parameter or

ATG Custom Catalog Creation Steps

ACC go to the Catalog Management - > Catalogs menu. You can see the folders already created for you like store Catalog Folder and Sub Catalogs Click on Sub-Catalogs folder,Click New Catalog button Name your new catalog and click OK,Your new sub-catalog will appear in the list.Click on your new sub-catalog and open it Add Category to Catalog Click the New Category button,name your new category and click OK Expand the new catalog and your new category will appear below it in  the left pane. Click the category name use the Add Category button and select the 'View by Listing' tab to find existing sub-categories select the appro priate Category and then choose 'Add Category'. Now in ACC select Catalog Management-catalogs Click on the 'Master Catalog' and then Add Catalog button.Select your  catalog and click the OK button. Assign Catalogs to Users Open ACC go to People and Organizations-Users and assign the catalog property. A

ATG Coupon Codes

Image
Creating a Coupon Code Under Purchases and Payments, click on the Gift Certificates and Coupons. Navigate to Coupon Item descriptor,then click on the New Item button on the top right corner of the window. No Coupon Codes should have the same characters with only Case mismatching. For eg: If there  is a Coupon Code by name “sc37d85”, then another Coupon Code with the names like “  SC 37d85 ”, “ sc37D85 ” etc should not be created.Also no spaces should be applied either at the start or at the end of a Coupon Code. The new Coupon window will look like the one below. The Coupon Code should be alphanumeric with a max length of 16 characters without any special characters.   A Coupon Code will be valid till the Expiration Date ,it can be made to expire by setting the desired value for the property Expiration date. Now Attach the Coupon Promotion to the Coupon Code as in the below screen shot. Note: Only the Coupon Promotion needs to be attached to the Coupon Code an

ATG Logging Tips Few things to know before start Logging

Always provide meaningful information in log messages Think in the direction how logging will help to solve an issue or report a status later stage in maintaining the application.This will inspire to add value while putting logging in your code. Its advisable,while logging include the name of the method,session ids ,this will help to easily identify which portion of code issue is and allow log entries to track back what user is doing to end up in an issue. Always use if statements before you actually write the logging code,refer the below example for this,otherwise you will end up logging everything which will have a serious impact on performance. This is good if (isLoggingDebug()) logDebug(“handleAddItemsToOrder() Executing Add Item To Order for session “ + getSessionId() + “ for product “ + getProductId()); This is bad if(isLoggingDebug()) logDebug(“ handleAddItemsToOrder() “Hello World”); Do not use two lines of logging when one would do ,because in act

ATG Coding Best Practices in writing a Function

Below listed few best practices while writing a Function . Function should not exceed more than 40 lines and should not perform more than one operation. Don’t pass more arguments(try to limit the maximum number by 5 ), as parameter in function with out valid reason. Since resolving a component is costlier and risky,always pass request and session scope objects to global scope component methods instead of resolve component. Declare variable in the beginning of block where you are planning to use it. Initialize local variables where they’re declared. You should not locally re-declare a member variable while  coding for a Function.This will gradually hide the visibility of  member variable. Do not directly access variable, instead use getter functions If a variable has been created only for a loop, use suffix 'temp' to let others know that the variable will be used only to store data temporarily. such variable should be declared  null at beginning of method a

ATG Component dos and donts

Try to keep Class and Component name same if possible(keeping in mind that one java class may be the source of multiple components ).Also try to match Component path with class package structure if class is not an ATG component extension. Always pass request and session scope objects to global scope component methods instead of resolve component. Use window scope when you want different browser windows to maintain different states (another way to do that is to use URL parameters—for example, if a user wants to view two different products in separate windows—however, sometimes URL parameters are not sufficient or convenient). ATG support Window scope which allows you to associate specific component instances with a specific browser window. Such components need to live longer than a request and also need to be different for every browser window associated with the user’s session. Global component should not refer any session/request scope component. Session compone

ATG Update Custom Catalog Structure

Image
Custom Catalogs structure are complex,for example a product or sku may appear in multiple catalogs/categories,so  whenever there is a change in the  Catalog structure  it  is critical to  maintain the relationships that form the paths,  from Catalog to  Sku .ATG has provided OOTB components and inbuilt options  to update the  Catalog structure whenever a change is made. Catalog Structure can be updated basically in 3 ways . The easiest method is via ATG Control Center,Open ACC,go to Catalog Management - Catalogs and select  'Update Catalog  Structure'  from the Edit menu.Click the 'Yes' button, you will see an  Update Catalog window in the ACC like below. Wait for the  process to complete. In the Admin UI click Commerce Administration link.In the 'Catalog Maintenance' Section  you can click the 'Basic Maintenance Link'. This will invoke all the functions of the  AncestorGeneratorService  and the CatalogVerificationService.It

ATG,Nucleus and Component

ATG is a framework for developing web applications . ATG is fast, scalable and based on J2EE standards. The ATG Adaptive Scenario Engine provides an open, server-side environment for building and deploying dynamic, personalized applications for the Web and other communication channels, such as email and wireless devices. The core of the platform is the Dynamo Application Framework (DAF), which implements a component development model based on JavaBeans and JavaServer Pages (JSPs). Nucleus is the ATG container for components ,provides a heierarchical name space Each component has a unique full name so that pages and other components reference it.creates and initializes component instance on request Decouples code from configuration and manages component scope. Any Java object with an empty constructor can act as a Component in Nucleus , so writing a new Nucleus component is as easy as writing a Java class. Nucleus components are standard JavaBeans, each with an accompanying .pr

ATG Scenario Donts

Exclude Anonymous Visitors, if possible filter out as many people as possible up front from your Scenario, try to minimize the number of visitors to whom the Scenario applies,in case if you have a large number of site users.Overall it will improve your system performance. The number of Scenarios you have enabled affects the performance of your site,for example if you have 15 Scenarios, each of which includes a page visit element, you may notice that pages load more slowly because the site must process 15 page visit elements,whenever the user visits any page.You can improve the performance by creating a single Scenario that contains one Page visit event followed by multiple actions. If an event is repeating in a Scenario,it will trigger multiple individual Scenarios to be created,so take utmost care while dealing with Repeated events. Since Collective Elements apply to all the users in a Scenario, try to reduce the usage,the performance will be compromised in case we

ATG Scenarios Internal Working

When the system loads Scenario,it is stored in an in-memory lookup table.if a new event generates,it comes to the system and system looks into the cache to see any scenarios are waiting for those events.Since this caching is done in Memory,it will be extremely fast. Scenarios are precompiled when Dynamo starts up, it parses Scenario’s XML  file into a state machine. During this pre-compilation phase, the system also performs a number of optimizations which maximize server performance.    Cost of a scenario will depend upon how often its triggered,if its triggered frequently then the cost associated will be high,to minimize this restrict the scenarios to group, lets say the group be 'all high end customers'.Also try to limit the occurrences of Scenarios. While starting the Dynamo instance we are running the  Dynamo Scenario Server software as well,this means both the  Dynamo activities and Scenario activities occur in same JVM. Internally Load Manager allo