Posts

Showing posts from July, 2012

google search results showing wrong posts

I primarily write blogs on atg topics and some general topics which i think  will help others,one fine day i noticed few of my posts are not displaying correctly  in google search results,while given a search criteria i am seeing  different posts  of mine displaying in the search results whereas my actual post for that search  criteria is not shown,due to this some of our new visitors may leave the site .This is a painful situation and we are helpless since google has its  own algorithm for displaying and filtering search results,to correct this  we can do some research on what went wrong and modify accordingly which is a permanent solution but time consuming.But most of the time we will leave this to google trusting it will correct this automatically. Instead you can  try some of the options below,which is not only a workaround but will make your site highly navigational and user friendly The first thought is how quickly we can redirect users back to actual posts he is loo

Logging without Extending GenericService

ATG has a built in logging mechanism provided by the class atg.nucleus.GenericService,the logging can be done through the methods logDebug(),logInfo() etc.Most of the frame work/Out Of the Box classes like DynamoServlet,GenericFormHandler,CartModifierFormHandler etc are extending the Generic Service class. But if you are writing a component class which cannot extend GenericService in its hierarchy,we need to do a small tweak like below. Create a component from the Out Of Box class 'atg.nuceus.logging.ApplicationLoggingImpl' . # /com/test/TestLogger #Thu Jul 12 21:22:19 GMT+05:30 2012 $class=atg.nucleus.logging.ApplicationLoggingImpl $scope=global loggingDebug=true Now create your own component class. Inject the logger into these POJO classes . package test; import atg.nucleus.Nucleus; import atg.nucleus.logging.ApplicationLoggingImpl; public class Testbean { private ApplicationLoggingImpl logger; public ApplicationLoggingImpl getLogger() { return logger;

Blog increase space between two widgets

Image
I have modified blog template   from three column to four column by adding one more sidebar.So now i can add more information  and ads to my blog,but unfortunately there is no widget/gadget spacing in the sidebar i added recently and as a result the ads added in these widgets are displaying very close to each other,not in a user friendly manner, like the screen shot above. I have added a small modifications inside the widget code.its nothing but adding a 'br' tag inside your HTML widget as shown below.Only thing you need to take care is to add this line below your ad code or in a seperate widget altogether and place that widget in between any two widgets. This tag will add two line breaks between  the widgets. See the screen shot below. Also see Blog option to delete images displaying ads side by side Remove duplicate title in blog

Blogger option to delete images from Picasa Albums

Image
Normally during blogging  you upload lot of images , but have  you ever  noticed where this images are getting stored,its getting  stored in the picasa web albums.Similiarly while deleting posts whether will the images are removed automatically ? No ,How can it be removed from the picasa web albums? When you delete a post,you will be shown a confirmation  page with the option 'Are you sure want to delete the Post?',then the entire post and below it will display all the images you uploaded with that post,if any , with a checkbox corresponding to each of it.You can select the checkbox to delete the images permanently from the picasa web albums . Another thing is when people want to remove one blog,they delete the entire blog one shot,but this will not remove the images from the picasa web albums.So if you are sure you dont want the images any more,better options is go to your individual posts and follow the above steps to delete images.I prefer this way tha

Initialize target environment and edit workflow to specify target

Image
Click the Make changes live button on the deployment administration configuration screen. In the New Site Initialization Options screen, leave Do a full deployment selected and click Make changes live. To follow the progress of the deployment, click Overview and open the Production site. Once the deployment is done, click back to deployment overview. Once the initialization process is done, you should see the following in the Deployment Overview screen: Edit workflows to specify Target Log on to URL: http:localhost:8180/dyn/admin. Click on ADMIN ACC and Start ACC in server VM. In ACC, select Workflow, publishing. Open and modify workflows under Commerce,Content Administration and Personalization folders. Select Target site in all the places where it is displaying in Red color. See also DeploymentTopology.xml

Manually Configure Deployment in CA Server

Image
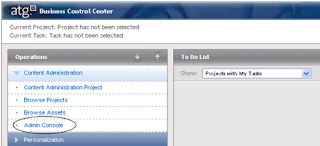
In BCC Home page click Content Administration - > Admin Console,this will take you to Deployment Administration page. Click Configuration link in the left column under 'Deployment Administration'. Set up the Production Environment. Click on the Add site link and Enter the following information. Scroll down further to the Setting Repository Mappings area. Select /atg/commerce/catalog/ProductCatalog as the source repository and /atg/commerce/catalog/ProductCatalog_production as the destination repository. It should look like the image below. Click the Add button. Repeat the same step above for mapping other repositories  like ClaimableRepository, PersonalizationRepository, and SecurePriceLists(mapped to PriceLists_production) and yourRepository component. Click Save changes. Click on the Agents tab, pictured below. Click on the Add agent to site link. Enter the following information Agent

Deployment topology xml file

Image
Deployment topology can be defined in 2 ways: manually creating using BCC or using the deploymentTopology.xml.  Deployment topology file can be located in the path - <atgxxxdir>/Publishing/base/src/config/atg/epub/deploymentTopology.xml As described earlier, the structure of the deployment topology contains the target sites, Publishing agents and source – destination repository mapping. Please find below the reference for deployment topology file for a staging and production instance. <? Xml version="1.0" encoding="UTF-8" standalone="no"?> <!DOCTYPE publishing-deployment-topology SYSTEM "http://www.atg.com/dtds/publishing_deployment/publishing_deployment_1.0.dtd"> <publishing-deployment-topology> <target> <target-name> Production </target-name> <description> Production , full deployment </description> <target-deploy-type> WORKFLOW </target-de

Nested Servlet Beans and Referencing Parameters

Image
Because a servlet bean's parameters have scope only within the bean itself, when you nest one servlet bean inside another, the outer servlet bean is not affected by the parameter values in the inner servlet bean. However, it is possible for the inner bean to access the values of the outer bean's param eters by prepending two dots (..) to the parameter names to distinguish them from the inner bean's parameters of the same name . Suppose, in the previous example, you wanted to display both the product's name and corresponding skus from the inner ForEach . You could do something like this: <droplet bean="/atg/dynamo/droplet/ForEach">   <param name="array" VALUE="/myBean.products">     <oparam name="output">            <droplet bean="/atg/dynamo/droplet/ForEach">        <param name="array" VALUE="param:element.skus">         <oparam name="output">