Posts

Showing posts with the label BCC

Update the ID Generator in BCC after DB Refresh

Run the following sqls to get the max id being used by the imported data on the PUB schema select max(category_id) from dcs_category; select max(product_id) from dcs_product; select max(sku_id) from dcs_sku; select max(media_id) from dcs_media; select max(folder_id) from dcs_folder; select max(price_list_id) from dcs_price_list; select max(price_id) from dcs_price; select max(sku_link_id) from dcs_sku_link; For each corresponding query above update the DAS_ID_GENERATOR in PUB schema update DAS_ID_GENERATOR set seed=<max from above +1> where id_space_name='category'; update DAS_ID_GENERATOR set seed=<max from above +1> where id_space_name='product'; update DAS_ID_GENERATOR set seed=<max from above +1> where id_space_name='sku'; update DAS_ID_GENERATOR set seed=<max from above +1> where id_space_name='media'; update DAS_ID_GENERATOR set seed=<max from above +1> where id_space_name=...

ATG Full Deployment Vs Incremental Deployment

Full Deployment Full deployment can be useful in the case when the assets on the target sites are modified manually or are corrupted. Target site might become inconsistent if a failure occurs during rollback,doing a full deployment,the previous set of assets created by different projects will become the  active assets of target site. Always gives the fresh latest version data to the target It can be time consuming as the all target data first purged then deployed again with previously deployed projects. It consumes number of resources on the target. Incremental Deployment It’s useful in the case when the assets which are deployed to the target are less in number after the first deployment. Whenever you have a need to rollback to the previous completed project then the incremental deployment is preferred to do because the full deployment will try to delete the all data from the target which can not be restored again. 1.   Faster than full deplo...

Initialize target environment and edit workflow to specify target

Image
Click the Make changes live button on the deployment administration configuration screen. In the New Site Initialization Options screen, leave Do a full deployment selected and click Make changes live. To follow the progress of the deployment, click Overview and open the Production site. Once the deployment is done, click back to deployment overview. Once the initialization process is done, you should see the following in the Deployment Overview screen: Edit workflows to specify Target Log on to URL: http:localhost:8180/dyn/admin. Click on ADMIN ACC and Start ACC in server VM. In ACC, select Workflow, publishing. Open and modify workflows under Commerce,Content Administration and Personalization folders. Select Target site in all the places where it is displaying in Red color. See also DeploymentTopology.xml

Manually Configure Deployment in CA Server

Image
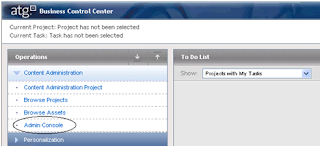
In BCC Home page click Content Administration - > Admin Console,this will take you to Deployment Administration page. Click Configuration link in the left column under 'Deployment Administration'. Set up the Production Environment. Click on the Add site link and Enter the following information. Scroll down further to the Setting Repository Mappings area. Select /atg/commerce/catalog/ProductCatalog as the source repository and /atg/commerce/catalog/ProductCatalog_production as the destination repository. It should look like the image below. Click the Add button. Repeat the same step above for mapping other repositories  like ClaimableRepository, PersonalizationRepository, and SecurePriceLists(mapped to PriceLists_production) and yourRepository component. Click Save changes. Click on the Agents tab, pictured below. Click on the Add agent to site link. Enter the following information ...

Deployment topology xml file

Image
Deployment topology can be defined in 2 ways: manually creating using BCC or using the deploymentTopology.xml.  Deployment topology file can be located in the path - <atgxxxdir>/Publishing/base/src/config/atg/epub/deploymentTopology.xml As described earlier, the structure of the deployment topology contains the target sites, Publishing agents and source – destination repository mapping. Please find below the reference for deployment topology file for a staging and production instance. <? Xml version="1.0" encoding="UTF-8" standalone="no"?> <!DOCTYPE publishing-deployment-topology SYSTEM "http://www.atg.com/dtds/publishing_deployment/publishing_deployment_1.0.dtd"> <publishing-deployment-topology> <target> <target-name> Production </target-name> <description> Production , full deployment </description> <target-deploy-type> WORKFLOW </target-de...

BCC site status inaccessible Agent Production in error state

Image
The Error Message showing in BCC T he error logs is showing the below message /atg/epub/DeploymentServer Failed to connect to agent 'Production'. This agent not allowed to be absent for  a deployment. The server will continue attempts to  intialize the connection. Set loggingDebug to true for  continued exception and stacktrace logging. Analysis This happens when the target/Production instance is down for some  reason or the RMI configuration which points to the target/Production instance may not be correct one. Fix If this is happening  due to target/Production instance down  then we can restart the target/Production Server,Other wise  correct the RMI configuration from the BCC agent configuration page and reinitialise. Verify the RMI Port in Configuration.properties file.Usually this file will be located in the path C:\ATG\ATG10.2\home\servers\ATGProduction\localconfig\atg\dynamo\Configuration...

BCC Search Indexing Configurations

Navigate to BCC -> http://host:port/atg/bcc Username:admin,Password:admin After login you will see 'Operations' tab under which you can see Search Administration option. Expand the ‘Search Administration’ under the ‘Operations’ tab. Click on ‘Browse Search Projects’ under Search Administration, Click on ‘New Search Project’ button. Enter the Search Project Name and Description under ‘General’ label,Search Project Name: Test_Search_Sebastian. Description:Any meaningful description(Example:Search Index). Click on the ‘Create Search Project’ button. click the ‘Add Content’ button under the ‘Content for Indexing’ label,Specify the Content Name. You can give any name (Ex:Content_Sebastian) and select ‘ATG Repository’ from the content Type dropdown. In the IndexingOutputConfig Path textbox, type the relative path  /atg/commerce/search/ProductCatalogOutputConfig of ProductCatalogOutputConfig located in C:\ATG\ATGXXX\home\ localconfig\atg\commerce\search ...

BCC Work flow changes not reflecting

Workflow changes not reflecting in particular(Production/Testing) environments. Solution You need to Stop CA first then,copy the workflowProcessManager.xml file to your localconfig like below. localconfig/atg/epub/workflow/process/workflowProcessManager.xml Process Editor Server Information Make sure the serverName and drpPort for the particular instance is correct. Otherwise workflow will not work. <?xml version="1.0" encoding="UTF-8" ?> <process-manager-configuration>   <process-editor-server>    <server-name> hostname:drp-port </server-name>   </process-editor-server> </process-manager-configuration> You can also find the hostname:drp-port from the component /atg/dynamo/service/ServerName.The serverName() method of this component will return these values. You can also refer other BCC issues here BCC Manage Snapshot functionality BCC Delete Meta Data Files  

BCC Deleting Meta Data Files and Fix for CA Server taking long time to Start

Below are the queries to delete projects which are in pending deployments stage and Meta data files from the CA database. Delete from epub_deployment; -- Deleting pending deployment. DELETE FROM das_depl_depldat;-- Deleting Meta data files from BCC. DELETE FROM das_depl_options; DELETE FROM das_depl_repmaps; DELETE FROM das_depl_item_ref; DELETE FROM das_depl_progress; DELETE FROM das_thread_batch; DELETE FROM das_deploy_data; DELETE FROM das_dd_markers; DELETE FROM das_deploy_mark; DELETE FROM das_rep_mark; DELETE FROM das_file_mark; DELETE FROM das_dep_fail_info; DELETE FROM das_deployment; Fix in case CA server taking time to start . Stop CA Server delete the entries from the table das_gsa_subscriber. Start CA Server Also see how to solve BCC snapshot mismatch issue .

BCC Creating Site group

Image
1 1. Site group – grouping site item, so that common      components (like shopping cart etc) can be shared for      all sites within the site group.  1 2. Add the sites which we created earlier to the Site   group,this attribute will group more than one site,   we shall add this site group further as soon we create more    sites. 2 3. Check all shared data, here shopping cart is shared among all        sites in the site group. 1 4. Site group successfully created. Currently group has only    one site.   s S See how to create a site

BCC Site Creation - Multi Site ATG10

Image
1 Creating site item using BCC tool. 1 1.  Login to BCC using admin/admin or siteadmin/siteadmin 2 2. In BCC Home -> Site Administration -> Manage Site 3 3. Site Administration UI opened up as below screenshot where in  B    BCC user can create site group, site item 4 Below screen shot depicts creating new site item in site-repository.     5.Fill Basic details like site Name,description.Site Category is default. A Also see below links on how to create   Site group S Site Category

BCC Manage Snapshot functionality

-    Snapshot management means, CA version manager maintains all snapshot number from different targets. If it finds any difference between the two target requires reinitialization. -    Reinitialization will just changes snapshot number on CA server and make it in synch with the one in Target. -    Generally this functionality is not available thru BCC but using admin UI it is available. -    But business wanted to be there in BCC and do not want to go to SAs for doing this so we added this in BCC. We added atg.deployment.server package in BCC src as some methods used were not public. We have written InitializeSnapshotFormHandler.handleInializeSnapshot(). See how to Reinitialize snapshot id in BCC    

Customize OOTB CMS to make Asset Deployments Faster

Once the CMS project is created,deploy the project to staging and production. This is a one time activity(adding the assets to the project and deploying) and it will take some time.it had taken a full day to finish this activity for us. Secondly,once the bad data is removed we can start modify/create/delete data through BCC and go for deployment.We can configure the CA side CMS to  be  incremental.It will trigger once you changed a project from 'author' state to 'Ready for staging approval'. For implementing this way you can customize the editCommerceAssets workflow to inject the custom action.You can add a logic in a way to switch b/w 'CA side incremental CMS' or 'ATG OOTB CMS' See Also http://atgtipsandtweaks.blogspot.in/2012/01/atg-catalog-maintenance-service.html

Catalog Maintenance Service Pre Requisites

There are mainly two activities to achieve this goal Firstly you need to remove all the bad data from your custom catalog. For this you can create a custom class,add a service method and make use of the manage Commerce assets workflow. These are the prerequisites Each category shall belong to one catalog,unassigned categories to catalog  will not be allowed,there should not be any open project in pending verification state  of Staging/Production target.There should not be any Active Projects in BCC,the  status of all the projects should be complete.All the orphan categories should be deleted. The service method will now create a project(CMS Project),This is  to link all the below properties correctly. Please find the properties here -> Product,product.ancestorCategories, product.parentCategoriesForCatalog, product.computedCatalogs,Category,Category.ancestorCategories, Category.parentCatalog,Category.computedCatalogs sku,sku.computedCatalogs Also s...

Catalog Maintenance Service Performance tips

We know that the ATG OOTB CMS runs on both agent-side as well as target-side after every deployment.Say if the user modified description of a product,the whole service is executed twice.It will consume a lot of time if your catalog has a lot of customization. Solution CA Side CMS This will improve the performance. This will trigger once you change the project from author state to ready for staging approval This will executes against a workspace(project)or in our case it will act only on that specific repository item(eg:change Product description). Find the Pre Requisites

Cache Invalidation Sample Code Smart way to Invalidate Cache

Create a new Class 'MyRepository' extending ATG’s GSARepository. Create an Instance variable to decide whether do we need to invalidate the Cache or Not ? Initialize it with true. private boolean mInvalidateCaches = true; Override invalidateCaches() method of ‘GSARepository’, inside this method call the super class method  super.invalidateCaches(),only if ‘invalidateCaches’ Variable is set to true,and this is  variable is set from the Versioned Repository component. Configure Repositories, which are taking part in Versioning with invalidateCaches=false . This will prevent ATG to invalidate Cache automatically when assets of that repositories are getting deployed. public void invalidateCaches(){   if(isInvalidateCaches()){         super.invalidateCaches();  } } Because we have Overridden invalidateCaches() method in MyRepository class, it will invalidate Cache only if invalidateCaches=true, A...

Merchandising Cache Invalidation Performance Improvement tips

How to Invalidate Cache in the off Peak Hours Generally in BCC prior to ATG 10, if we deploy a new asset,the entire cache is  getting invalidated.This entire cache invalidation  process consumes a lot of time. This happens even though our change  is minimal for Eg:modifying description of a Product or Sku. Moreover this puts an additional overhead on Database Servers if all the instances  running in clusters tries to refresh the cache by pulling the fresh data from the Database.  The site performance can impact badly if we are doing such deployments on the normal business hours. Work around -> ATG Manul Cache Invalidation

Manual Cache Invalidation while Deploying Assets

Disable the Automatic Cache Invalidation and make the Cache Invalidation Process Manual As you know currently after every deployment the cache is getting invalidated automatically,so the first step towards this is to disable the  automatic cache invalidation after every deployment. By doing some customization you can achieve this,so that you can progress your work of deploying assets during regular business hours and not to Invalidate cache each time  the Deployment happens. But to see the deployed changes on the target site we have to manually perform Cache Invalidation, which can be done during off peak hours, so that site performance is not compromised. Also see Cache Invalidation Sample Code

Selective/Smart Cache Invalidation

Enable Selective/Smart Cache Invalidation In ATG 10 we have a feature newly added to handle the automatic cache invalidation. This feature tracks which assets are deployed and invalidate cache only for those assets. There will be a patch provided by ATG to implement this feature in previous versions. you may need to contact ATG for further details. Please verify how to configure selective cache invalidation on the below link. Selective cache invalidation will works only on item descriptors with cache mode is set as simple cache. Even if Selective cache invalidation is enabled,the method invalidateCaches() clears all caches from the target repository. Brief On each Production Repository pointing to atg.adapter.gsa.GSARepository,there is a property 'selectiveCacheInvalidationEnabled' which needs to set to true,default is false.To achieve this,you need to add an entry to the Repository component in your Application,if not layer the Repository component in your ...

VersionManagerService Component versionedRepositories property

/ a tg/epub/Version/VersionManagerService this is the component where you can list all your Versioned Repositories.  It has a property defined for this ' versionedRepositories '. eg: versionedRepositories+=\ CustomProductCatalog=/atg/commerce/catalog/ProductCatalog \  ....... You can find the Repository name from the property ' repositoryName '.This property will be present in all versioned repository components.While adding you need to specify the full nucleus path of that component. eg: Go to ProductCatalog Component and look for the repositoryName and path. This property ' repositoryName ' will not be present in UnVersioned Repositories.